Coupons4LV.com  -  Tree Hugging Frugalitarian

 
  • Blog

Lighten your electric bill - Brighten your home

12/16/2011

1 Comment

 
Picture
Let me guess - you rushed out to the home store sometime in the past few years and bought some flourescent flood light bulbs for your home's recessed downlights. After installing them and realizing that the light quality stinks and also you have to wait for them to "power up" till they are bright - you broke down and re-installed incandescents anyway to replace the lousy flourescents. In addition CFL bulbs can pose a potential health risk - link here. 

Well I bring you great news. If you're able, head to NJ and pick up some of these retrofit LED(light emmitting diode) lights at the home store. (They are available elsewhere, but the tax laws in NJ currently make it less costly than other surrounding states). Alternatively get them online - see link below. (Note: The Cree CR6 have a 50k hr and 5 yr warranty vs. home store's version 35k hr and 3 yr warranty)

They are dimmable, instant on, and install in around 2-3 minutes. (though you need to ensure that your dimmer is compatible - link here) The electronic low voltage dimmers work best with shared circuits. Combine these LED lights with an occupancy/daylight sensing dimmer switch and you have a real energy/time saving powerhouse.

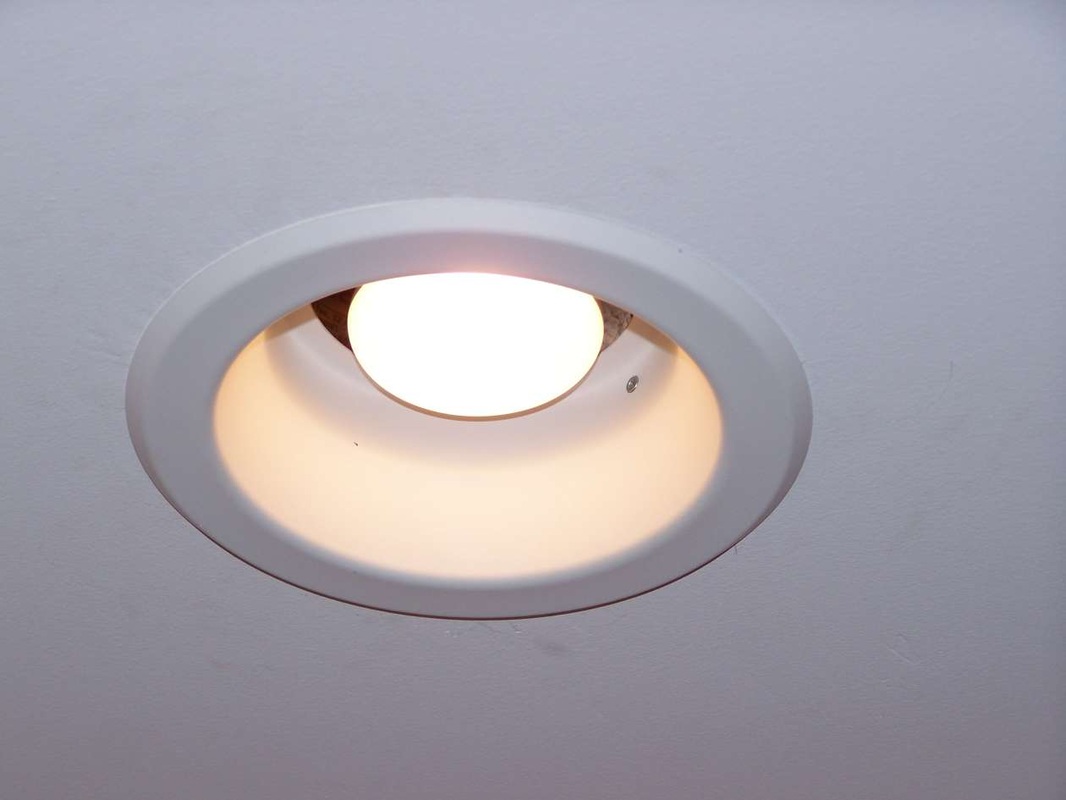
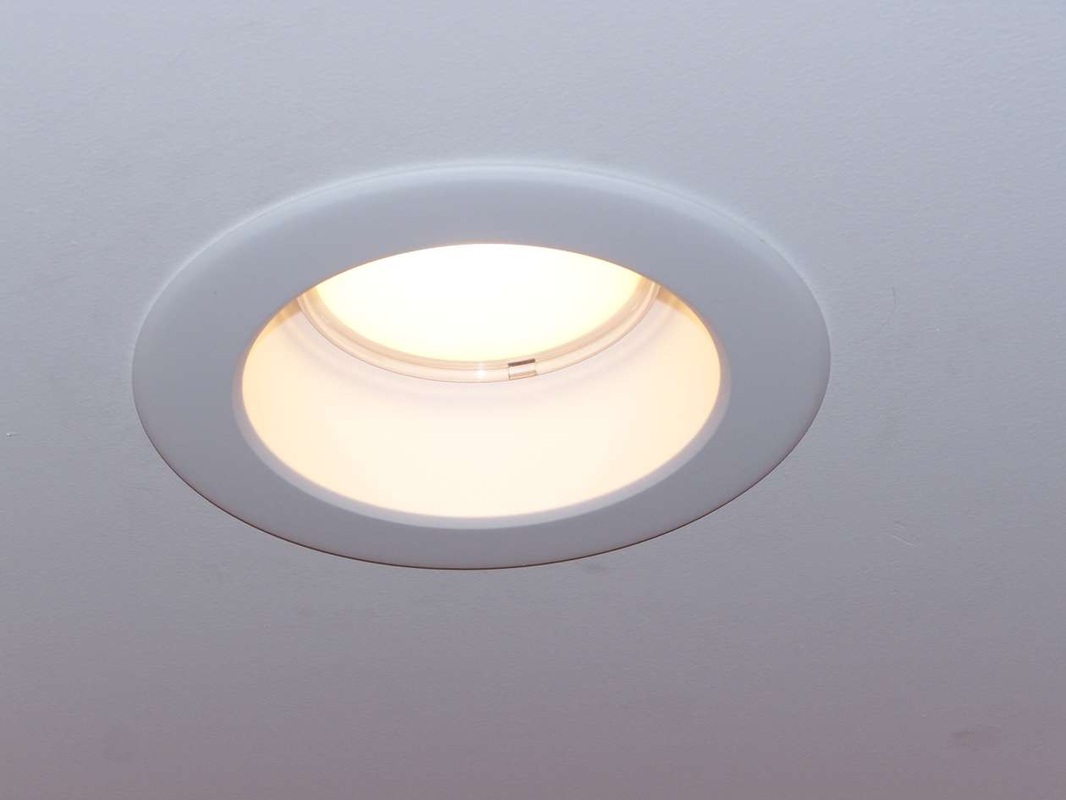
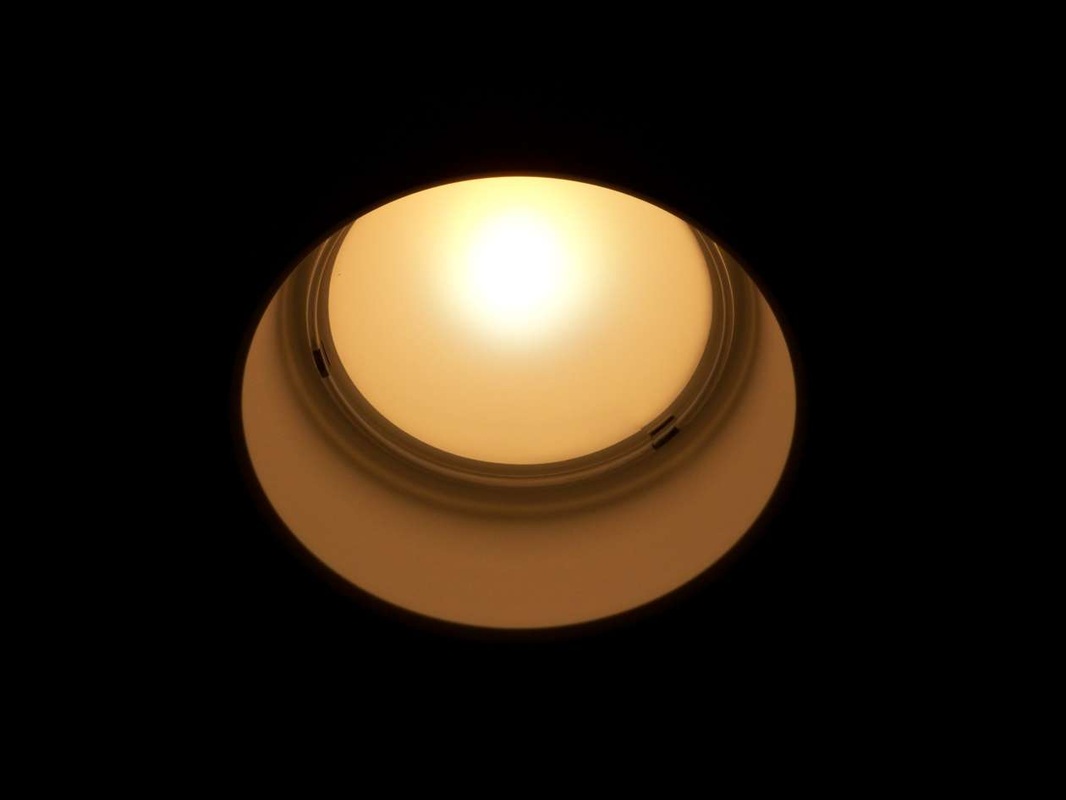
They consume only 10.5 watts yet throw off an amazing amount of light. Another plus is that you can not tell they are LED. There are no visible dots of light like many screw in bulbs on the market. The transluscent lens on the fixture casts beautiful clean light. Challenge someone to come over to your house and tell which one is LED vs. Incandescent.

Update 12-18-15: Put the newer suggested Cree model that is now available with the wired socket.(See updated links below) Makes for a much easier install and works with a wider variety of fixtures. Also make sure you get the foam insulating rings if putting them in a ceiling that has attic space above.

Instructions for the swap:

1. Grab some safety glasses as everything is overhead, and will likely fall in your eye otherwise

2. Make sure the light switch is turned off - allow bulb to cool

3. Unscrew old light bulb - donate or recycle. Don't trash old CFL's they have mercury vapor which is extremely toxic. (could also use/keep them for applications low use areas like basements or garages)

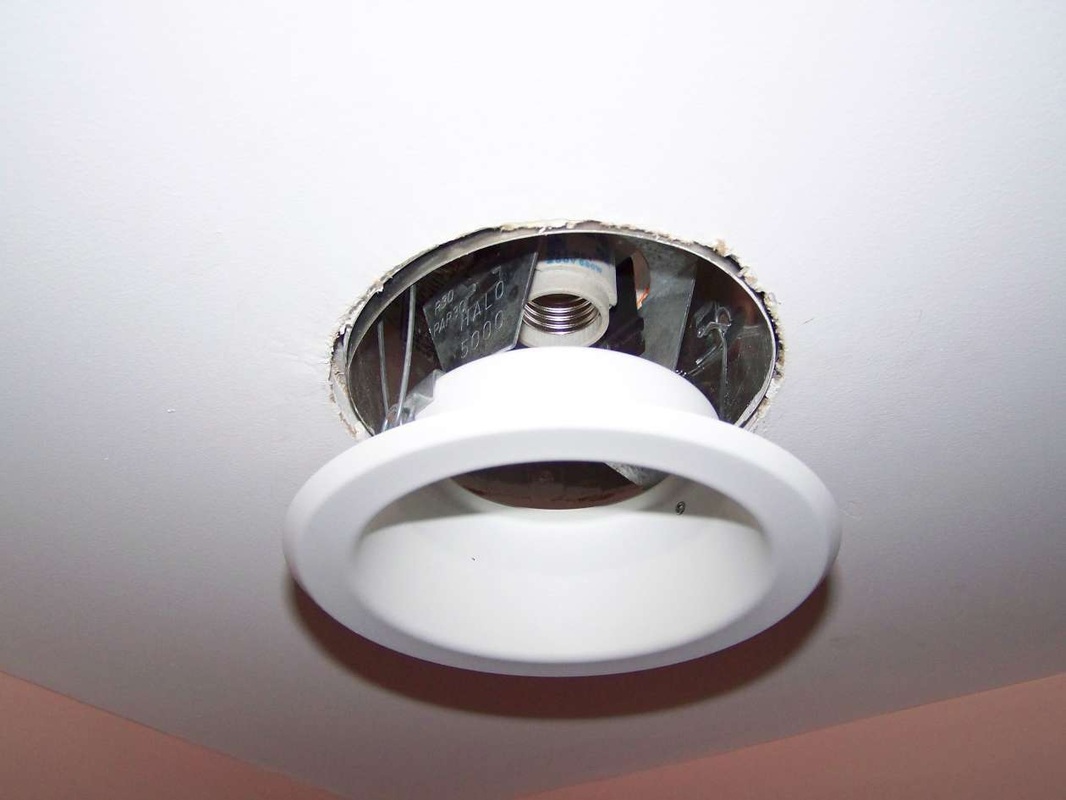
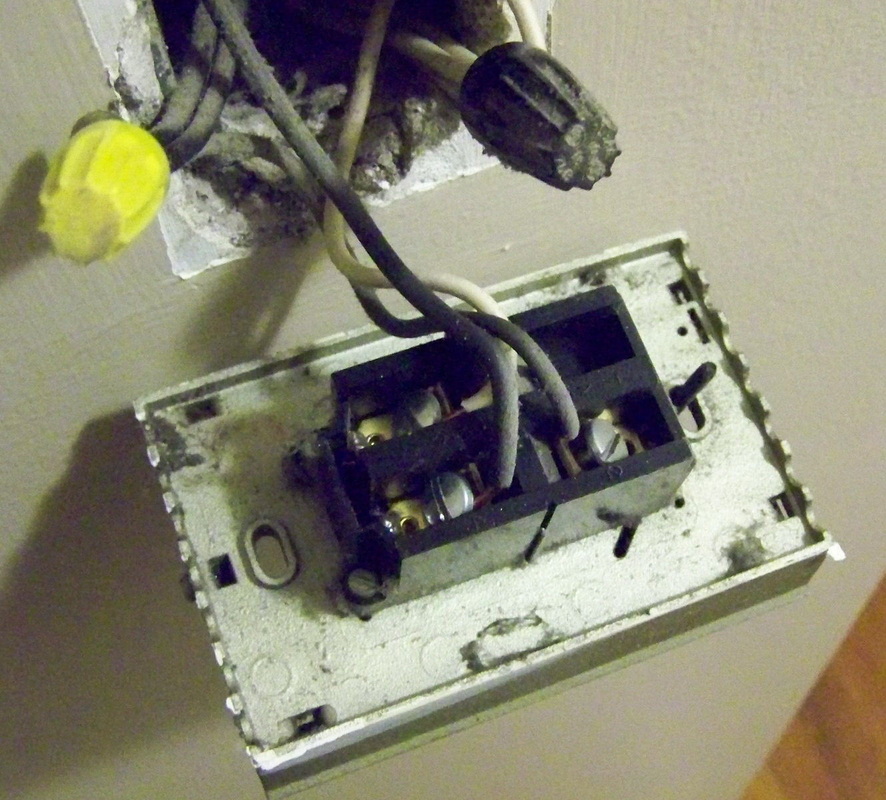
4. Remove the trim ring (pay attention to the springs and wear gloves if you have delicate hands)

5. The springs will want to destroy the drywall upon exit, so keep a firm grip.

6. Remove the ceramic bulb socket from the trim ring (on some cans lights, it is screwed to the top of the steel housing instead).

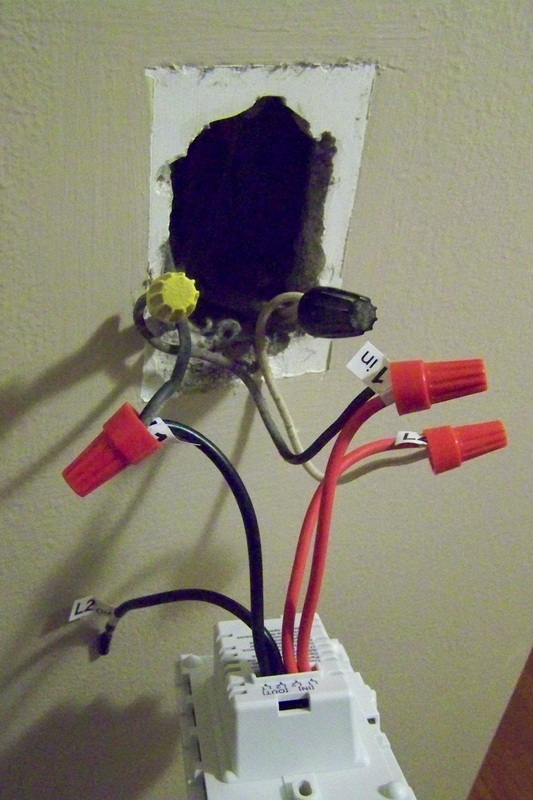
7. Screw in the new LED retrofit light

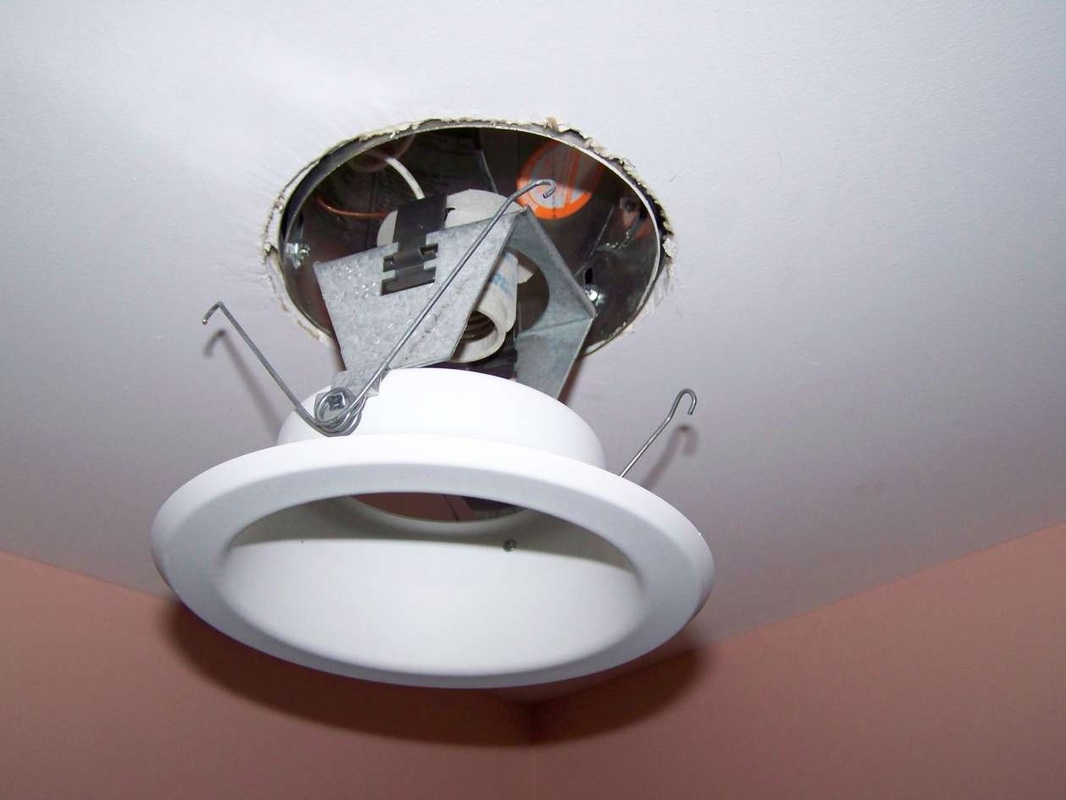
8. Rotate the (3) spring clips out all the way clockwise until they are locked

9. Test that the light turns on properly

10. Carefully bend down the 3 tabs simultaneously (wear clean thin gloves, as these three spring tabs can deliver a nasty finger cut if not careful) and guide them up into the recessed housing.

The force from the springs keeps the fixture lodged very  tightly  - (but it is removable if need be)

Based on 3hrs / day, these lights powered with a Cree chip should last for 22+ yrs or so… another benefit is less heat gain in the summer time, which translates into lower cooling bills.

The color rendering is phenomenal - even better than incandescents.
 You can even pair black, brown and blue socks without difficulty!

The time to switch to LED is now - prices are down and quality is up.
 Just say no to ugly flourescent lighting in the home.
1 Comment

Making electric baseboard heat more efficient

3/5/2011

4 Comments

 
PictureElectric Baseboard heater
Looking for a way to make your electric baseboard heated home more efficient? Why not consider swapping out your antiquated thermostats with a more modern programmable unit? Despite the bad rap, heating a home with direct resistance heat can be a bit de-humidifying, but it's actually a fairly efficient use of electricity. (Especially if you have solar panels on your roof or an array in the yard) All of the energy consumed gets emitted directly as heat, where as with a combustion heat (oil or gas) there are losses. Only a percentage (although significant) of the total energy of combustion is utilized. The only factor is really the amount of time the electric baseboard heat is on and the temperature at which the thermostat is set. 

Typically when we sleep, temperatures in the house can dip down to 60-62F and we are still comfortable under the covers. When we rise in the morning, the temp should be around 66-68 F otherwise getting out of bed is not very tempting. Leaving for work or play? Have the heat ramp down to 60 till you get home in the evening. If you have a temperature sensitive pet, make sure they have an area where they can keep warm during the day. Coming home to a house that's comfortable temperature makes returning home that more enjoyable.

Here are some simple instructions for swapping out your old baseboard heat thermostats.

Turn off power at circuit breaker

Turn up thermostat to make sure the heater does not turn on

Use current sniffer / Volt alert tool to make doubly sure power is off.

Remove the old thermostat, typically only need a blade screw driver.

Note: Most homeowners do not remove the thermostats when painting. While you have the thermostat(s) off the wall, apply paint that matches the walls around the thermostat. Home stores will match the paint, just bring them a chip. Use a hair dryer to have it completely dry in a few minutes so you can get to the main task at hand. Painting around thermostats can be done, but often it gives you a very unprofessional looking result.

Wire the outer two wires to the black wires coming from the heater, wire the inner red to the neutral (white wire) coming from the heater.

Use wire nuts and make sure to use good quality electrical tape to secure wire nuts. (Baseboard heat due to it's cycling will cause wires to come loose easily through thermal contraction and expansion. Apply the tape and wrap it counter clockwise to make sure the wire nut will not come loose inside of the wall box.

Many job boxes are small, so take care to place the wires back into them carefully, I like to use the end of a screw driver for the final push to make sure they are pressed inall the way.

Do one last visual check on the wires to make sure none fall out or have become loose.

Screw on the base plate of the new thermostat.

Install the 9V battery and program the unit based on your schedule and your requirements for the room.

Switch the heat slider on the right side of the unit to on, then place the control portion onto the base module.

Turn the breakers back on and then make sure the heater turns on properly, if not you have something mis-wired and will have to try again. (The usual culprit, is that you wired the inner black wire instead of the outer black wire.)

I have had good results with the LUX ELV4 unit. PPL electric will give you a 100% rebate on these units (save your reciept) up to $50 each. So take advantage of this offer while it lasts. (12-18-15 Not sure if these rebates are still available.)

4 Comments

Solar Powered Attic Fan Installation

2/20/2011

1 Comment

 
Picture
Summer will be upon us in a few short months - is your attic ready?

Attic temperatures during the summer months can reach staggering temperatures - as high as 160 degrees in some parts of the country. this heat buildup not only increases your air conditioning bill but also degrades your sub roof. A 25 yr shingle is worthless on a roof that has rotting or buckling plywood underneath due to heat damage.

This past summer, I installed a solar powered fan to remove heat, moisture, and stagnant air in the attic. The benefit is that the fan only operates on sunny days and does not increase your power bill. If you have room for gable vents on either side of your house it is an easier installation than a roof penetration. Note: Though not required, the best time to install a a fan like this is prior to siding or re-siding your home.

Step 1 - Install some attic lighting if you don’t have some already. Measure the opening in your attic walls and get a pair of vinyl gable vents, make sure you have a good quality ladder, or borrow one from a friend. (Typically the installation will require you to be both inside and outside on the roof, with your final steps to be done outside after the fan is installed.)

Step 2a - pencil out on the inside and drill a hole in your attic wall through each corner of the portion of the vent that protrudes through the wall. This will be for the inlet side, as the attic fan will not work properly unless it can draw air across the attic. double check, then saw-zall out the rest of the required cut-out. Note: If you have properly functioning ridge vents or soffit vents this step is not required.

Step 2b (Many houses have a window in the attic that you can use to install your attic fan, in that case, remove the all or a portion of the window and make a cutout of OSB or plywood with a vent hole to accommodate the new gable vent/fan combo. Wrap the OSB with Tyvek so that you keep the wood free from damage, use staples to hold it in place. P.S. get the yellow handled staple gun, other kinds are not good and will have you cursing.

Step 3- Secure the fan in place and ensure that the power cord goes through the vent to the solar panel.

Make sure the solar panel is facing South or Southwest , you want to collect the most sun later in the day, as the attic won't really heat up to maximum till mid to late morning. When securing the panel to the roof, make sure you cover up the bolt holes with lots of silicone sealant to avoid leaking issues. Tighten all the panel adjustment bolts, so that you don’t have any surprises from the wind. Use a temperature thermostat to keep the heat in your attic in the winter time to save on your heating costs, (otherwise the attic fan will run whenever the panel is exposed to the sun.) Also, you can get additional modular panels to double the power of your fan, or install them at different solar collection angles, but I have found that the single 10W panel is plenty to cool a 700-1000 square foot attic space.

Step 4 - Fasten the OSB board into the window frame or cut out that you made for the fan, I like to use hurricane clips as they are inexpensive and very flexible in their mounting configurations. Secure the fan in four locations on the inside to prevent vibration, three is not adequate. Also try to block out as much airflow around the perimeter of the fan, to avoid blowback out of the sides.

Step 5 - Enjoy your lower electric bill from reduced summer cooling load, more enjoyable time when looking for items in the attic during the day, longer lasting sub roof, and increased home value..

Update: 11/15/14 added a Fire Cutoff switch - this is a good idea as firefighters have no way to turn off the fan in event of a fire. the Fire cut off switch will melt at 280 F so that the fan will not draw air into the attic, burning your entire house down with a quickness.... make sure to install one on your fan, I had to use some butt splice connectors as the spade connections that came with it did not fit.

1 Comment

Nightlight Theory

2/13/2011

0 Comments

 
It's nighttime and dark in the bathroom - if your frugal like me, you rely on a motion activated daylight sensitive LED nightlight. Nightlights that stay on all night are silliness, unless: 
  • you have guests staying over
  • have a small child who is afraid of the dark
  • make it a habit to leave hazards on the floor in random places. 

Studies also prove that exposure to bright lights in the middle of the night mess with your body's internal sleep cycles. Properly functioning "smart" nightlights will remedy this situation. The kicker is that using the nightlight will save you money over time vs. turning on the full bathroom light.

Incandescent lights are not efficient, they generate a lot of heat and the bulbs burn out. Get rid of your old school night lights and upgrade to a more functional model. Unplugging and plugging, or switching on and off "dumb" nightlights is ridiculous in the modern era.

Below is a model I recommend, just make sure the seat is down when you're done :-)

0 Comments

Soften the light and save - use dimmers and LED lights

10/22/2009

2 Comments

 
Many good citizens do the right thing and have been converting most of their incandescent to CFL’s (compact fluorescent lamps) because they save money/energy. However, there are many situations where an incandescent lighting solution is the better choice. Incandescent light offers a warmer glow and a less harsh experience on the eyes than fluorescents. So for that living room spot, dining room chandelier, conference room presentation lights , or sconce mood light….how can we be more efficient? The answer is dimmers. Reducing the light to just 80% of the rated capacity greatly lengthens the bulbs life in addition to the power savings. It has also been shown to increase work productivity in many environments. Check out this article from the Morning Call.

LED(Light Emitting Diode) lighting is another solution that is readily available these days. One of the nice things about LED lighting is that the energy consumption is a fraction of even what a CFL consumes. The light quality of an LED bulb is also very good, plus it contains no mercury like a CFL. Most of the LED lights are fully dimmable too, which is another added benefit. Though they are more costly initially – LED lights will likely outlast everything else in your home (and save you money each month). Contact me if you are interested in getting more info or purchasing Cree or Solaris LED light fixtures - we get them at wholesale.

The following emit the same amount of light when used for a spotlight application:

60Watt Incandescent Spot light bulb = 13Watt CFL spot =  6 to 7Watt LED spot light !


2 Comments

What is so great about geothermal heating?

10/13/2009

0 Comments

 
Geothermal heating uses renewable energy to reduce our dependence on fossil fuels while reducing home heating bill by 50 – 70%. Geothermal systems (a.k.a. ground source heat pumps, water source heat pumps, geo-exchange) uses the earth’s relatively stable temperature as a heat source for heating, and a heat sink for cooling. This allows geo heating and air conditioning systems to reach incredible efficiency ratings over conventional means.

The arguments for using a geothermal heating system have never been stronger. It is more important than ever that we all spend our money wisely. So the benefit of saving 50-70% on our heating bills is easy to see, as are the benefits of reducing our carbon footprints, and keeping our energy dollars in the U.S. economy.

80% of homes in the Northeast heat by burning #2 heating oil. This accounts for 80% of #2 oil usage in the United States! In 2008, nearly $1.6 billion was spent on home heating oil. Unfortunately 75% of that money ($1.2 billion) left the U.S. economy to foreign countries. By using geothermal heat pumps & equipment manufactured in the U.S, installed by U.S. companies, and operated on U.S. generated electricity, we can solve our energy needs, maximize our economy, and improve our national security.

A 30% federal tax credit is now available to homeowners who install a geothermal system and a 10% tax credit is available to businesses. This makes now the perfect time to invest in your future by installing a heating system that will save you money for decades to come while increasing the resale value of your home.

0 Comments

Why not put the outlets at work - to work for you ?

10/4/2009

0 Comments

 
Are you a hard working employee that wants to save a few dollars per year? Charge your electronic devices at work. Mobile phone, laptop, camera batteries, Plug-in car or electric scooter, etc… they all add up over time. fyi: If you are not a hardworking employee, might not want to get too crazy here. I have an electric scooter like the one pictured below and used it to commute to work for the entire year!

Leaving your home for more than a few days? Consider switching off all your circuit breakers except for your fridge and heating system if needed! You will be surprised at how many appliances/household devices slurp energy when they are not in use.

0 Comments

Stay cozy at night, be greener, and slash your heating bill simultaneously

9/30/2009

0 Comments

 
Remember the electric blankets of the past - the cords, lumpy spots, shock hazards, and cold mattress sheets? Check out the new kid on the block, the electric mattress heating pad. It slips on under your regular mattress cover and you can barely tell that it’s there. Gone are the heating element kinks and failures caused by rustling the blanket. The cords are completely hidden and dual controls make it easy to adjust either side to a comfortable temp. Now you can crank down your heat to 62 at night and still be a cozy 75-80 in your bed. Below is a link for you on amazon to utilize.

Think of all the oil, coal, wood, or natural gas you will save during the sleeping hours. The electricity to power the blanket costs a fraction of what it would be to heat the whole home.

The only hard part is getting out of bed when that alarm clock goes off in the morning,..then again with a programmable thermostat, it’s a non-issue.
0 Comments

Eliminate your electric bill!

6/30/2009

0 Comments


So you have read about solar photovoltaic power systems for residential and business applications, but have never really seriously considered putting one on the roof? Well I have some great news. The federal and state tax implications put in place in 2009 finally give solar an ROI (return on investment) that makes sense. Take a look at the federal rules http://tiny.cc/sfQng and the PA regulations http://tiny.cc/o1Kkh  Why not take advantage of Solar Power to further your savings. Imagine the pleasure of getting your power bill each month and seeing a payment due of only a few dollars instead of hundreds. Aside from the savings, think of how many tons of CO2 you will eliminate by going solar. Contact us for a quote today

0 Comments

Power saving tips

5/31/2009

0 Comments


If your like me, you check your email or have it pushed to your cell phone/mobile device pretty often. However, - If you're in a movie, an airplane, sleeping, or somewhere else you know you can't be reached, why not power off your phone completely?  Just keeping it on vibrate uses its battery when you don't need it.  Your voicemails and texts will arrive later when your ready to re-connect with the network.

Also please remember to keep those chargers, stereos, and flat screen TV's on a power strip. They use a fair amount of power even in standby mode. The power strip makes it easy to turn on and off without the hassle of plugging/unplugging.


 *Updated 1/22/11 Or you can get the smart power strip below which will automatically turn off your peripherals when not using the main device. this will add up to significant savings over time.

0 Comments
<<Previous
    Picture
    see if your home qualifies

    Categories

    All
    Coffee
    Craigslist Etiquette
    Cree Led
    Decreasing Power Bill
    Fixing Hardwoods
    Gardening
    Green Commuting
    Heavy Bag Installation
    Home Heating Hot Spots
    Less Pollution
    Moving
    Nightlight Theory
    Organizing
    Polluting Less
    Rain Water Collection
    Saving Money
    Saving Time
    Self Defense
    Self Hair Cutting
    Smart Power Strip
    Smart Take Out Boxes
    Solar Power
    Solar Powered Attic Fan
    Staying Warm
    Texting And Driving
    Thermostat Installation
    Yard Care

    Author

    Lehigh Valley Veteran - The Green Bargain Hunter

    Picture

    Blogroll

    Be the Bee Social Media Coaching
    Lehigh Valley with Love
    Digital Signage Insights
    Juicing Art
    365 Days Of FFFFound Poetry
    PriusLiftSupports
    Urban Shelf
    Sprout Defender

    Archives

    February 2018
    November 2017
    March 2017
    February 2017
    November 2016
    April 2016
    August 2015
    June 2014
    April 2014
    April 2013
    March 2013
    March 2012
    January 2012
    December 2011
    November 2011
    April 2011
    March 2011
    February 2011
    January 2011
    March 2010
    February 2010
    December 2009
    November 2009
    October 2009
    September 2009
    July 2009
    June 2009
    May 2009
    April 2009
    February 2009
    January 2009

    RSS Feed

    View my profile on LinkedIn
    Picture
    Picture
    Picture
Powered by Create your own unique website with customizable templates.